
Completion requirements
1. Strategies for Brainstorming
Carousel Brainstorm
Divide students into groups/teams of three to five people.
Assign a group to each posted chart paper or whiteboard. Groups will remain together throughout the activity. Ask each group to select a person to record. Group members are then asked to brainstorm ideas on the topic for three to five minutes. For added effect and clarification of which group wrote what, give each group their own color of marker.
You now have several groups all brainstorming at a different sheet on a different topic.
When time is up, the teacher signals and asks each group to move, with their colored marker, one station to the right. Groups then read and ponder the brainstormed ideas from the previous group(s) and add to the list. Groups brainstorm for three to four minutes. Teacher signals again and same movement continues until all groups in the room have brainstormed on all sheets of newsprint. Each group adds to the ideas of the group before them. Teacher may consider decreasing the amount of time brainstorm time as activity goes on.
At the end of the activity (15-20 minutes), the teacher may suggest a “gallery walk” where students are asked to circulate and read what each group has recorded on their respective charts.
The teacher processes with large group by asking for any insights or reactions to the overall activity. It is suggested that the teacher, or a volunteer from the group, follow up by typing the ideas listed on the charts and sending the information to the group members.

Fishbowl
Closed Fishbowl:
Fishbowl, also known as Clusters or the Group-on-group Technique, is a highly worthwhile tool for the teacher who is interested in dynamic group involvement methods. The fishbowl can assume several configurations. Its most common form is simply an inner circle (Group A), which is the discussion group, surrounded by an outer circle (Group B), which is the observation group, as shown in the figure below.
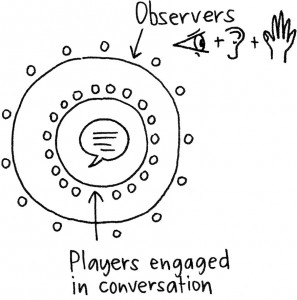
The inner group can be given an assignment based on content, processing, or both. If the assignment is one of content, you ask the inner circle (Group A) to discuss for the content 10-30 minutes. The outer group (Group B) observes silently. After the inner circle's time is up, the outer circle can be asked to reflect and comment on Group A’s deliberations. Group roles can then be switched with the same discussion topic or a new topic can be assigned. It is also useful, in some learning situations, to repeat the same process a second time. Each group thus engages in discussion and observation twice.
If anxiety exists in the inner circle because of the presence of the observers in the outer cluster, it (the anxiety) should be processed. By talking about it, the imagined fear can be readily handled. Conversely, until the anxiety has been acknowledged orally, the inner group is likely to be inhibited in its discussion.
In discussing process as opposed to content, the inner group focuses on the behavior of the other group as a functioning unit. In effect, one small group is giving the other small group feedback about its performance or behavior. The feedback may relate to individual or group functioning, or both.
Note: An alternative to public discussion of individual behavior is to process such data privately in dyads (pairs). This more private procedure may be essential if one senses that students are not ready for the more usual public feedback. But a possible shortcoming of this procedure is that in the absence of group surveillance the feedback may be toned down or not given at all.
Fishbowls work best when the inner and outer groups are small in number—not more than 10 persons. The smaller group ensures more "air time" for everyone and encourages greater willingness to contribute.
If the total group is fairly large, e.g., 20-30 students, there is no reason why two to four fishbowls cannot operate simultaneously. A good-sized room or separate rooms will facilitate this operation.
Open Fishbowl:
In this mode, one chair in the center is left empty. At any point during the discussion, any member of the audience in the outer circles can approach the center and join the fishbowl. When a new person joins, a current member of the fishbowl must
voluntarily leave which frees a chair. The discussion continues as participants enter and leave the fishbowl.

Force Field Analysis
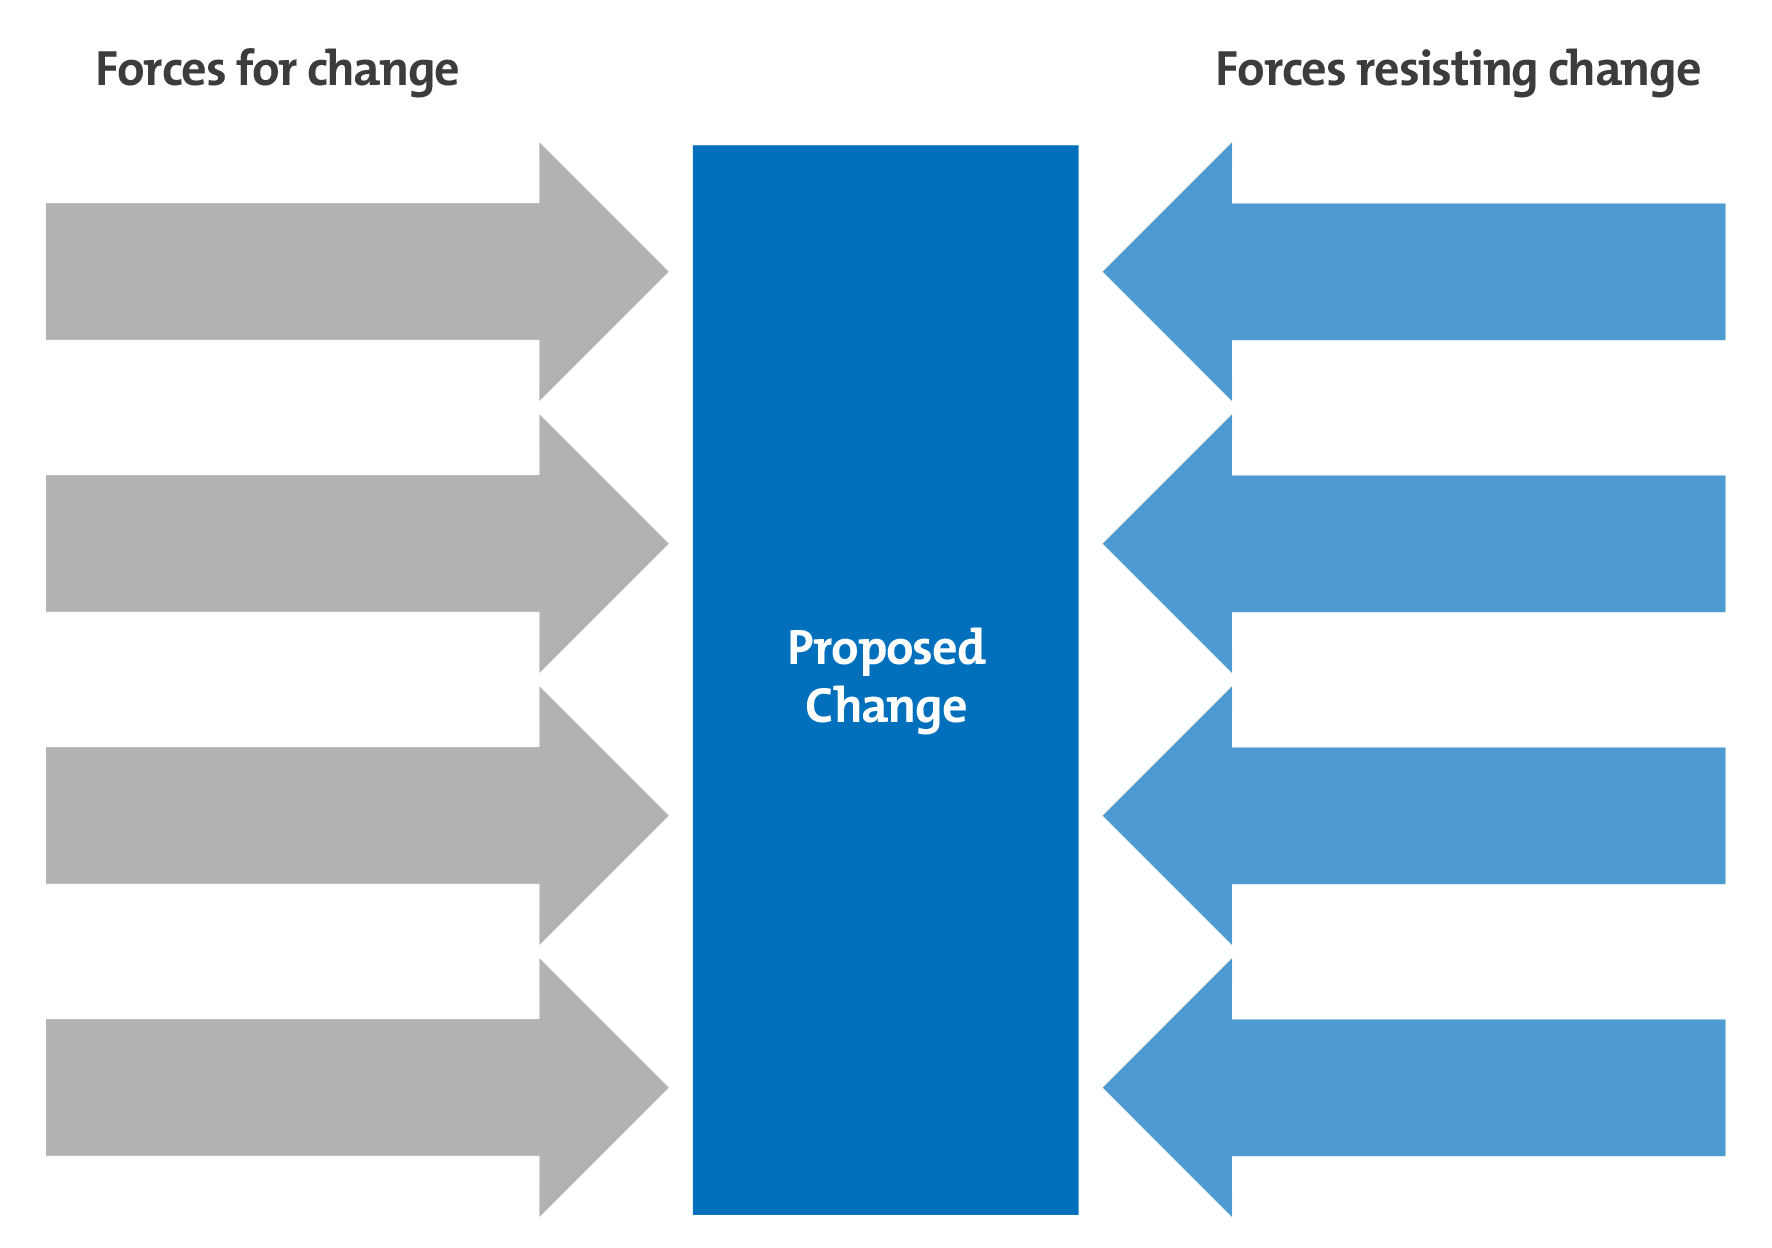
Force Field Analysis is a structured method that allows learners to collectively consider the barriers and the supports that exist in meeting a goal, making a decision or solving a problem. Once barriers are surfaced, learners can develop strategies for overcoming those barriers and drawing upon existing support. Force Field Analysis can be a very valuable strategy within an action planning process.
Step 1: Identify the goal or problem
Step 2: As a group brainstorm all of the forces that exist that will help in reaching the goal.
Step 3: As a group brainstorm all of the forces (barriers, problems, deficiencies, etc.) that exist that will hinder reaching the goal.
Step 4: Prioritize the barriers to be addressed.
Step 5: Problem-solve the prioritized barriers.
Template for Force Field Analysis Process:
Stepladder Technique
Step 1: Present the task or problem to all students. Give everyone time to think about what needs to be done and to form their own opinions on how to best accomplish the task or solve the problem.
Step 2: Form a core group of two members. Have them discuss the problem.
Step 3: Add a third group member to the core group. The third member presents ideas to the first two members before hearing the ideas that have already been discussed. After all three members have laid out their solutions and ideas, they discuss their options together.
Step 4: Repeat the same process by adding a fourth member, and so on, to the group. Allow time for discussion after each additional member has presented his or her ideas.
Step 5: Reach a final decision only after all members have been brought in and presented their ideas.
This can be done with small groups brainstorming various aspects of the task or problem.
Round Robin Brainstorming
Step 1: Identify and present the problem or task to the group.
Step 2: Let each individual students think creatively, without being influenced by others. Each student will quietly think and write down is idea and/or solution on the paper or index card.
Step 3: When everyone has written down their idea, the cards are passed to the person next to them. Everyone will review their neighbor's idea, and add additional ideas to it. That stimulates everyone to engage with the creativity of someone else.
Step 4: Every student has used their neighbor's idea to inspire different, new ideas. Next, these index cards are passed on again as well. This circular exchange of ideas continues as long as necessary to get to a decent number of ideas. Just as during regular Brainstorming, it is also about quantity and not yet about quality. When the time is up, the facilitator will collect all ideas.
Step 5: Have students or the teacher collect all ideas, writes them down on the white board or flip chart and discusses them with the group. The same or similar ideas are grouped together. Next, the group will make joint choices and assess the ideas’ feasibility. By the way, the facilitator will also hold on to the ideas that do not make it, because sometimes they can come in handy at a later time.
Mulder, P. (2017). Round-Robin Brainstorming. Retrieved [October 1, 2019] from Tools Hero: https://www.toolshero.com/creativity/round-robin-brainstorming/
Gallery Walk
Basic Structure: Stations or posters are set up around the classroom, on the walls or on tables. Small groups of students travel from station to station together, performing some kind of task or responding to a prompt, either of which will result in a conversation.
Variations: Some Gallery Walks stay true to the term gallery, where groups of students create informative posters, then act as tour guides or docents, giving other students a short presentation about their poster and conducting a Q&A about it. A similar strategy called Chat Stations, where the teacher prepares discussion prompts or content-related tasks and sets them up around the room for students to visit in small groups.
https://www.cultofpedagogy.com/speaking-listening-techniques/
Affinity Mapping
Basic Structure: Give students a broad question or problem that is likely to result in lots of different ideas, such as “What were the impacts of the media on behaviors and attitudes?” or “What makes factors influence decisions about drug use?” Have students generate responses by writing ideas on post-it notes (one idea per note) and placing them in no particular arrangement on a wall, whiteboard, or chart paper. Once lots of ideas have been generated, have students begin grouping them into similar categories, then label the categories and discuss why the ideas fit within them, how the categories relate to one another, and so on.
Variations: Some teachers have students do much of this exercise—recording their ideas and arranging them into categories—without talking at first. In other variations, participants are asked to re-combine the ideas into new, different categories after the first round of organization occurs. Often, this activity serves as a good pre-writing exercise, after which students will write some kind of analysis or position paper.
Teach - OK